


Showing posts with label holidays. Show all posts
Showing posts with label holidays. Show all posts
Tuesday, December 31, 2013
Tuesday, October 29, 2013
Assemble Rubber Stamp Project #2: DIY Wrapping Paper
It's been a bit since our Assemble Rubber Stamp Project #1, and with the holidays coming, we thought we'd do a quick tutorial on DIY wrapping paper with our dashing polar bear stamp. We wrapped this package with DIY wrapping paper made from regular old printer office paper, junk mail (yes!) and our stamp.

To create this package, you will need:
• blank sheets of paper (we used office paper and a Tiffany & Co. envelope)
• a stamp
• ink pad
• your box!
• double-sided tape
• scissors
• baker's twine or ribbon


Stamp your image onto the paper in whatever design you prefer. I stamped this paper a few days before hand because the coating on the printer paper was a bit slick, and the ink needed to dry.

If you need to seam pieces of paper together to be big enough to fit your box, flip the page over and place double-sided tape as close to the edge as possible.

Connect with the other sheet, and remember to use this "seam" as one of the box's corners (see photo below).

Fold your page over, find the edge of the box and either cut or fold your paper to size. Place double sided tape to the very edge of that fold or cut and tape to the other side of the paper (which should be folded in underneath).


Push the end flap down and create a seam. Fold the side flaps into perfect triangles and place double-sided tape to the edges of these folds (see pic below, you can just make out the tape).

Tape the two side folds in and secure. Place double-sided tape along the triangular edges of the last flap, and fold in toward the center. Secure in place. Repeat these steps on the other side.


To create your gift tag, stamp on a different colored cardstock and cut close in a rectangular shape. Tie baker's twine around the package and slip the card under the top bow. Done and done! A perfect package for pennies.

To create this package, you will need:
• blank sheets of paper (we used office paper and a Tiffany & Co. envelope)
• a stamp
• ink pad
• your box!
• double-sided tape
• scissors
• baker's twine or ribbon
Stamp your image onto the paper in whatever design you prefer. I stamped this paper a few days before hand because the coating on the printer paper was a bit slick, and the ink needed to dry.
If you need to seam pieces of paper together to be big enough to fit your box, flip the page over and place double-sided tape as close to the edge as possible.
Connect with the other sheet, and remember to use this "seam" as one of the box's corners (see photo below).
Fold your page over, find the edge of the box and either cut or fold your paper to size. Place double sided tape to the very edge of that fold or cut and tape to the other side of the paper (which should be folded in underneath).
Push the end flap down and create a seam. Fold the side flaps into perfect triangles and place double-sided tape to the edges of these folds (see pic below, you can just make out the tape).
Tape the two side folds in and secure. Place double-sided tape along the triangular edges of the last flap, and fold in toward the center. Secure in place. Repeat these steps on the other side.
To create your gift tag, stamp on a different colored cardstock and cut close in a rectangular shape. Tie baker's twine around the package and slip the card under the top bow. Done and done! A perfect package for pennies.
Friday, March 22, 2013
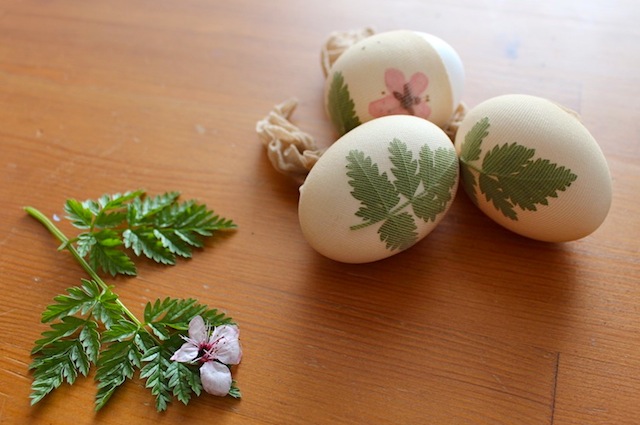
Dyeing Easter Eggs Naturally with Onion Skins

It has been a VERY long time since I've dyed Easter eggs. Probably about fifteen years. However, I have always loved the look of the blood-red Easter eggs that are traditional in the Greek culture. I know they use special dyes for their eggs, but I had heard about an interesting method for using yellow onion skins that I thought would be easy to try. They didn't come out as red as the dye would have made them, more of a dark reddish-brown, but I'm still impressed with the outcome. Check out the process below, plus an awesome tip involving pantyhose to make natural imprints on the shells.
Ingredients:
• Yellow onion skins (skins from about 10-15 onions, depending on how many eggs you are making)
• White cage-free, organic eggs
• a few dashes of salt (to prevent shell breakage)
• 1 tablespoon of vinegar (to prevent egg seepage)
• regular old pantyhose
• some flora of your choice--make sure none of it is poisonous. (I used cherry blossoms and ferns).


Tuesday, December 18, 2012
From Stitching to Stamping: DIY Gift Wrap
I'm one of those people that thinks that the outside of the package is just as (if not more) important than what's on the inside. --that sounded really shallow, but I'm about to show you what I mean-- Emily and I delight in a perfect package. Having worked at Paper Source for several years, we learned the art of a seamless package with perfect bows. After leaving there, we put our own spin on it. My signature wrap is paper stitched together (no tape) with some baker's twine. However, when I caught a glimpse of Kristy Hogue's perfectly stitched packages on Instagram, I rethought my technique (and my sewing machine!)
Kristy used decorative stitches to embellish craft paper, plus the Owl in a Tree Stamp she got at Assemble! I love how polished they look. Here's a few practice stitches she made before the project, and then the finished results:


Photos via Kristy's Creativequality Instagram PLUS Owl in a Tree Stamp, $13
I got all excited about different kinds of wrap, and started clicking around and finding some other creative pieces. Check out these free printable Cross Stitch wrapping papers from Minie Co. that you can print at home or at a local print shop. Download them here.

Another crisp and clean white look, with holiday crosswords you can customize yourself, from Italian designers Fabio Milito and Francesca Guidotti.

Photo via Fabio Milito and Francesca Guidotti
Another beauty, stamped & stitched vintage paper wrap, via Freshly Found: 
Photo via Freshly Found
And if you're not into the whole paper thing, try making an artful package with twine! I love this simple red box with lots of bright, cream cotton string and a sweet, cross-stitched gift tag, from Erinzam.

Photo via Erinzam
Love it! Let's go wrap presents!
Kristy used decorative stitches to embellish craft paper, plus the Owl in a Tree Stamp she got at Assemble! I love how polished they look. Here's a few practice stitches she made before the project, and then the finished results:
Photos via Kristy's Creativequality Instagram PLUS Owl in a Tree Stamp, $13
I got all excited about different kinds of wrap, and started clicking around and finding some other creative pieces. Check out these free printable Cross Stitch wrapping papers from Minie Co. that you can print at home or at a local print shop. Download them here.
Another crisp and clean white look, with holiday crosswords you can customize yourself, from Italian designers Fabio Milito and Francesca Guidotti.
Photo via Fabio Milito and Francesca Guidotti
Photo via Freshly Found
And if you're not into the whole paper thing, try making an artful package with twine! I love this simple red box with lots of bright, cream cotton string and a sweet, cross-stitched gift tag, from Erinzam.
Photo via Erinzam
Love it! Let's go wrap presents!
Subscribe to:
Posts (Atom)