Showing posts with label crafting. Show all posts

Friday, March 25, 2016

Friday Fun: Print, Paint and Ink!

It's been a long time coming, but our book is finally available for pre-sale. We've shrunk it down a bit from our original title, into a bite-sized fun pack of inky goodness. Included in the text are over twenty of our favorite printmaking, painting and stamping projects that you can do in your own home.


Print, Paint and Ink: Over 21 Modern Craft Projects for You and Your Home

The 21 projects in Print, Paint & Ink are perfect for anyone interested in learning to make their own stamps, prints, and painted goods. From natural dyes and inks to linocut stamps, jewelry, ink transfers and more (plus a bit of embroidery and sewing thrown in!) there are tons of techniques and projects for crafters of all ages within these covers.


Print, Paint and Ink: Over 21 Modern Craft Projects for You and Your Home

Easy and adorable Teeny Tiny Eraser Stamps, stylish Furoshiki Wrap and so much more, there's something in here for every skill level. You might even get a sneak peek of one or two of our kiddos too! Click the link or on the photos above to check it out on Amazon, for pre-sale, available August 16th, 2016. 

More to come!


Monday, April 29, 2013

A Crocheted Baby Blanket

A baby nephew is coming, and I decided it was time to put my money where my mouth is and make something lovely. I started out using the Crocheted Granny Square pattern in cream, but it the squares were a bit too big with wider spaces for little baby hands. So I took our existing pattern, shrank it up a bit and used a light taupey-grey yarn. Here are the pictures I took along the way:

crocheted baby blanket in grey

crocheted baby blanket in grey
The concept
crocheted baby blanket in grey
Piecing
crocheted baby blanket in grey
Scalloping the edges
crocheted baby blanket in grey
Blocking and ironing
crocheted baby blanket in grey
Finished!

I love the granny squares in solid colors. It brings a whole new feel to the pattern. What do you think? Ready to make your own?

Friday, March 22, 2013

Dyeing Easter Eggs Naturally with Onion Skins

naturally dyed easter eggs with onion skins

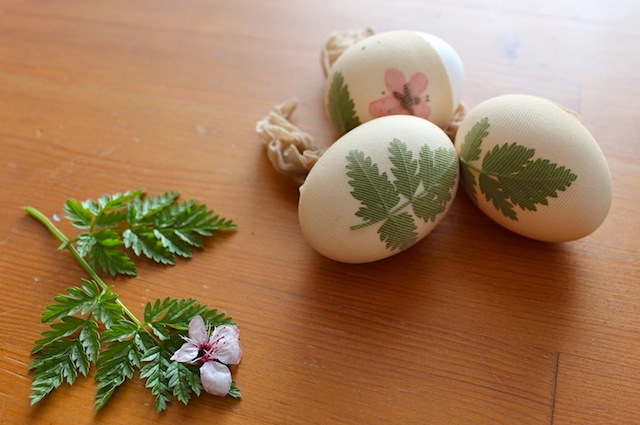
It has been a VERY long time since I've dyed Easter eggs. Probably about fifteen years. However, I have always loved the look of the blood-red Easter eggs that are traditional in the Greek culture. I know they use special dyes for their eggs, but I had heard about an interesting method for using yellow onion skins that I thought would be easy to try. They didn't come out as red as the dye would have made them, more of a dark reddish-brown, but I'm still impressed with the outcome. Check out the process below, plus an awesome tip involving pantyhose to make natural imprints on the shells.

Ingredients
:
• Yellow onion skins (skins from about 10-15 onions, depending on how many eggs you are making)
• White cage-free, organic eggs
• a few dashes of salt (to prevent shell breakage)
• 1 tablespoon of vinegar (to prevent egg seepage)
• regular old pantyhose
• some flora of your choice--make sure none of it is poisonous. (I used cherry blossoms and ferns).

naturally dyed easter eggs with onion skins

Cut about four inch sections of the pantyhose (enough to wrap around an egg and make a knot).

naturally dyed easter eggs with onion skins

Place whatever you would like to imprint (in my case, a mini fern) over the egg to your liking.

naturally dyed easter eggs with onion skins

Gently wrap the pantyhose over the fern and pull tight to keep it in place and allow dye to soak through. Tie a secure knot in the back.

naturally dyed easter eggs with onion skins

After you are finished positioning your imprints of all of your eggs, place them in a stew pot on top of the onion skins. I left a few uncovered to be able to see the color change accurately, as well as to have some simple ones. Fill the pot with water just enough to cover the eggs, and place the burner on high.

naturally dyed easter eggs with onion skins

After the water reaches a rapid boil, decrease the heat to medium and boil for about 12-15 minutes. Check the color at 12 minutes and if it is to your liking, remove the eggs and place them in a colander. Turn cool water on over them and gently remove the pantyhose.

naturally dyed easter eggs with onion skins

You're done! Happy Easter!

naturally dyed easter eggs with onion skins

Thursday, January 31, 2013

My Favorite Crafting Tools

I thought I'd share some of my favorite crafting tools. When you worked in craft and design, you start to assume that everyone knows about every magical product that you do--but that's not the case! Here are my top seven tools:

favorite crafting tools xyron martha stewart versamark

1. My great grandma's vintage crochet hooks. I'm not the greatest crocheter in the world, but I love using these and knowing that they have been in the family for generations. My own baby blanket was crocheted using these hooks and I'm honored to use them again.

2. I know it's silly, but Vanna White's yarns are the best! Vanna's Choice by Lion Brand are worsted weight acrylic and come in the best colors. I'm allergic to wool, so this makes for the best blankets and scarves. I'm working on a special project right now. more to come!

3. The 12" Guillotine Trimmer, available at Paper Source. I love their description: "Inspired by the French with the best of intentions, only this time adapted to fit paper. A very cool way to trim large sheets of paper with a crisp, clean straight edge. Also available in 6", 8.5" and 12" wide base. Napoleon would be so proud!" Anything involving the French Revolution gets me going. I have two of these and neither have ever gotten dull. I love love love them!

4. Martha Stewart All-Purpose Craft Scissors. These are the sharpest, most meticulous scissors I've ever used. You'll want to have a separate pair for fabric, (and the odd bang trim!)

5. Rubber stamps! Some people swear by acrylic, but I love the feel of an old rubber stamp. Or a new one! Next week I'll use these Yellow Owl Workshop ones to show you a masking trick!

6. Versamark Watermark Ink Pad. Oh, how I love this schtuff. It creates the look of a colorless watermark when using stamps. Try it with embossing, and you get a colorless, glass-like surface.

7. The delightful, 1" Button Press. This machine began my official foray into my craft career, ten years ago. We still make buttons at Assemble today, and it's one of my favorite things to do. Besides, what's cuter than a button?

What are your favorite tools?

Friday, December 14, 2012

Introducing: The Assemble Crafting Kits

We are so excited to FINALLY introduce our Assemble Crafting Kits. We have worked tirelessly on them to bring them to the masses, and are proud and happy to get them out before the holidays! We have a total of eight new kits, including: Needle-Felted Sushi, Needle-Felted Breakfast, Needle-Felted Sweets, Crocheted Granny Squares, and Hardcover Bookbinding in a variety of paper styles. Each kit includes everything you need to create the project, plus a full-color, photographed instruction booklet. Those are our hands!


Needle-Felted Sushi Kit, $30


Needle-Felted Sweets Kit, $30


Needle-Felted Breakfast Kit, $30


Crocheted Granny Square Kit, $35


Hardcover Bookbinding Kit in Orange Bean, $40


Hardcover Bookbinding Kit in Lime Lattice Recycled Rag, $40
Hardcover Bookbinding Kit in Silver Leaf on Gray/Blue Lokta, $40
Hardcover Bookbinding Kit in Turquoise Mums Lokta, $40

Please join us tonight (Friday, December 14th) from 6-9pm for our official release of the kits, champagne, and my awesome husband and our dear friend playing Christmas music (see below for a glimpse!) for our LAST Assemble party in this space. We are excited to see you, and can't wait. xo Andie & Emily

Little Saint Nick from Adrian Centoni on Vimeo.


Thursday, October 25, 2012

Kit Assembly Party!

Last night, Assemble hosted a "kit assembly party" and lots of wonderful friends came out to support us by helping to put together our long-awaited kits. They're almost here, guys!! Sustained with wine, pizza and Halloween candy, it was a fun-filled four hours of taping, cutting, winding of yarn, tubing of needle-felting needles, sewing of crochet hook pouches, the whole nine yards. We're getting so close to showing you pictures of the actual kits, but in the meantime, check out some of our fun below.

yarn spools for crafting kits at Assemble crafting party
Little wooden yarn spools for the crochet kit!

little test tubes for needle felting needles and toothpicks at Assemble crafting party
Tiny test tubes full of needle-felting goodness!

amy bengtson and chika eustace of velouria boutique cutting yarn for assemble crafting kits at party
Amy Bengtson and Chika Eustace of Velouria Boutique helping out!

pizza at crafting party
mmmm. pizza.

felt for crochet hook pouches ready to be cut at the crafting party
"Cut & sew me, please!" -felt.

Special, special thanks to:

Chika and Cat of Velouria Boutique in Ballard
Amy Bengtson of Amy Bengtson Jewelry
France Wisniewski of Bananafish Studios
and Christian Powers, husband/teacher/musician extraordinaire.

Kits coming so soon!!


Tuesday, October 23, 2012

More Fall Fun: Modern Decaled Pumpkins

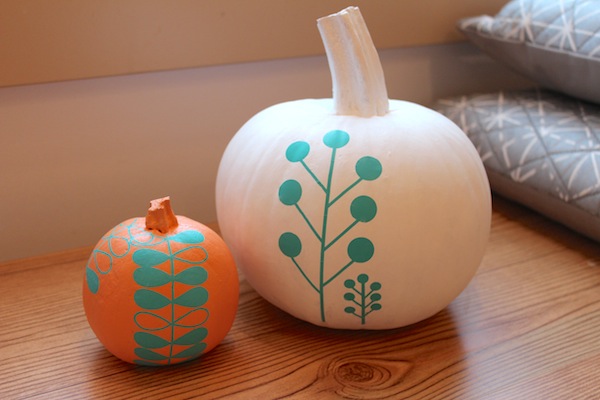
I have to admit: I am absolutely terrible at carving pumpkins. I always have these grand ideas for my carving project and then it always ends up being a giant, ugly smile with candle fully in view because I have to scrap the whole thing. So, this year, I decided to take a different angle. We're having a little autumn party next week and I thought this would be a good excuse to spend a rainy day indoors and get some decor ready! Learn steps to make these modern decaled pumpkins by clicking below!

modern pumpkins autumn project party with rub on decals ala lotta jansdotter


Monday, October 22, 2012

DIY Autumn Craft: Needle Felted Acorns

Happy Monday!

We're a little bit obsessed with these tiny little acorns made of felt. They are simple to make and a little cup of them or scattered around a fall table is just so cute!

how to make a needle felted acorn with geometric tray by piano nobile and white pumpkins autumn halloween thanksgiving decor
Acorns by Assemble, tray by Piano Nobile, $40


We wanted to start our crafting video series (more coming soon!) with How To Make a Needle Felted Acorn. This was so fun to make, we hope you enjoy and share! Happy Autumn!

How To Make a Needle Felted Acorn from Assemble Shop and Studio on Vimeo.


Blogging tips