Showing posts with label stamping. Show all posts

Wednesday, March 6, 2013

Crafty Project: Recipe Cards with Small Object Stamps

There are some beautifully designed, ready-made recipe cards out there that would do just fine for a kitchen collection, but nothing beats whipping some up on your own--even just for the fun process! I played around with washi tape and the Small Object Recipe Card Kitchen Stamp Set (and some ink pads and my typewriter of course) to make a recipe card of my Berry Medley Smoothie.

make your own recipe card using rubber stamps, ink and washi tape

Since the recipe fractions in the stamp set are all on one stamp (economical!), I used the same old masking technique (remember that post from last week?) from our last stamp tutorial to single out the exact numbers that I wanted to use. I just cut out a little mask out of excess card stock. See below:

rubber stamping technique masking

Easy-peasy! And yes, I did just want to use the tablespoon stamp, that's why I added "happy." But come on, they're so cute!! Oh and the Sweet Tooth. He's just so darn cute too!! See all of the Small Object stamps and stamp sets here. Now cook one up!

the small object stamp set kitchen recipes and sweet tooth
Recipe Card Kitchen Stamp Set, $24 and Sweet Tooth Rubber Stamp, $6.


Monday, February 18, 2013

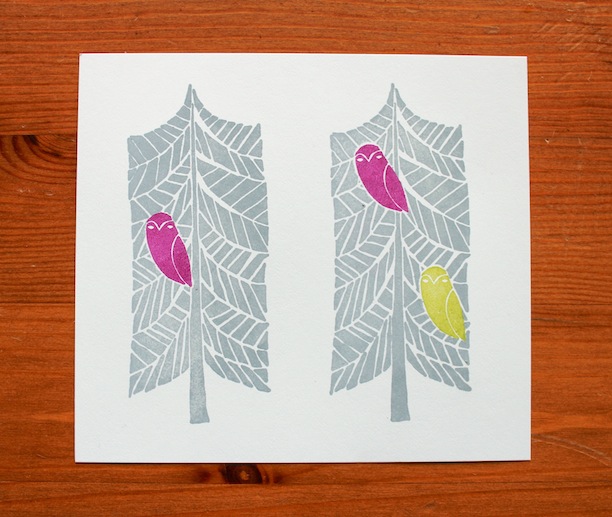
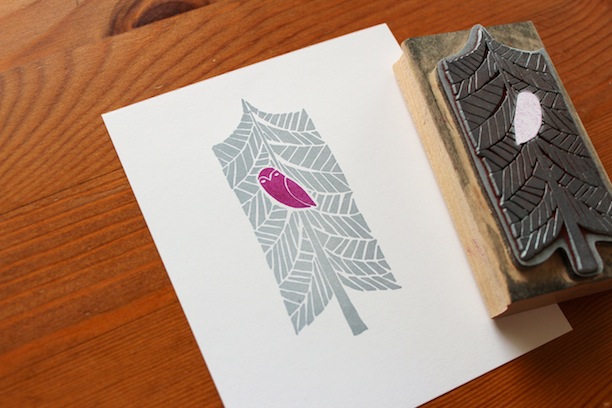
Quickie Stamp Tutorial: Masking with Yellow Owl Workshop Stamps

masking rubber stamps tutorial with yellow owl workshop stamps

Have you ever seen a stamped image like the one above and thought, how the heck did they do that? It's a simple stamping technique that comes in super-handy: masking. See below for easy instructions!

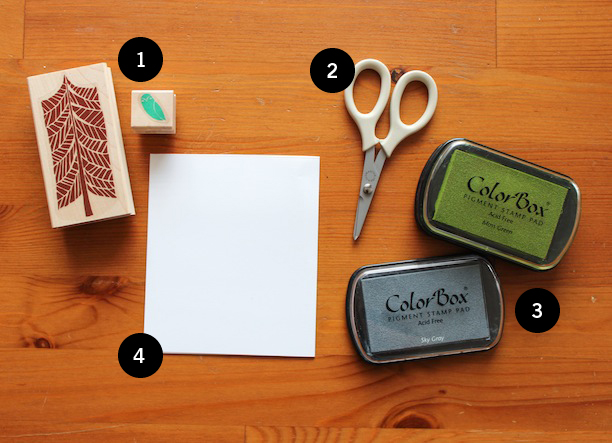
You will need:
1. Stamps! I used Yellow Owl Workshop's Owl & Tree set, $13.
2. Crafting or precision scissors. Mine are from Martha Stewart's crafting line.
3. Ink pads! I used a few Colorbox pigments--Peony, Moss Green and Sky Grey (available at most craft stores).
4. A surface to stamp on, some scratch paper and some thin paper such as a post-it. I used some bright white Mohawk paper for all of the above.

masking rubber stamps tutorial with yellow owl workshop stamps

To begin, ink your owl stamp and press it a few times on your scrap paper to get it good and ready. I've found that stamp impressions always look the best after a few impressions and ink saturations. Once you've done this a few times, ink the stamp and press it onto your post-it or thin paper. The post-it works well if you don't have the steadiest hand, because you can utilize the glue on the back of the post-it.

masking rubber stamps tutorial with yellow owl workshop stamps

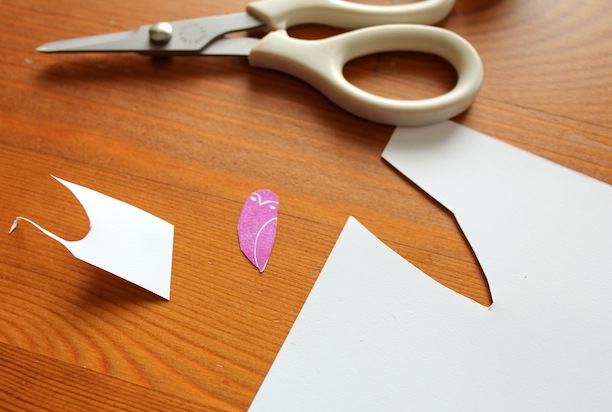
Get a really good impression and wait for it to dry. Then cut around the impression, staying just inside the lines.

masking rubber stamps tutorial with yellow owl workshop stamps

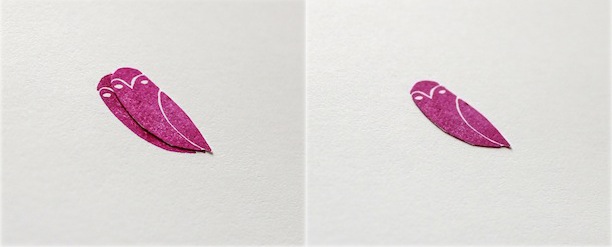
When you have a good cut-out or "die-cut," stamp another impression of your owl onto whatever you would like to use as your finished piece (a card, a piece of stationery, etc.) Get a good impression and then lay your cut-out (the mask in masking!) you just made over the impression. This is where the post-it glue comes in handy, as the glue keeps it in place. Get it completely lined up with the final impression.

masking rubber stamps tutorial with yellow owl workshop stamps

Repeat the inking and impressing process to get your tree stamp ready for the finished product. When it is inked evenly, gently place it over your masked owl and press down firmly. Try not to move the stamp, but make sure you press evenly, especially around where the owl is. Then, lift the tree off of the page.

masking rubber stamps tutorial with yellow owl workshop stamps

Perfect! Your owl is now sitting in the tree. Use Windex and a paper towel or a baby wipe to clean your stamp (or if you're fancy-pants, use real stamp cleaner!) and repeat.

I love this technique, you use do it for many types of projects and can create whole scenes with different colors by using the masking technique. Good luck!

Thursday, January 10, 2013

Simple Stamping & Embossing: Thank You Notes

making yellow owl workshop stamp set thank you notes
Yellow Owl Workshop Many Thanks Stamp Set, $13

Have you written your holiday thank you notes yet? I have to admit that I haven't. I'm usually one of those people that does it so quickly that I may as well write it in front of the giver, but this holiday season was a busy one with packing up the space, etc.

Now that I have a bit of time, I thought it would be fun to make my own! If you lke rubber stamps, but haven't embossed, let me tell you: you're going to love it! Embossing (in stamp & ink terms) is the process of melting tiny granules of plastic over your image to create a shiny, raised impression. Heat embossing also sets the image, so there is no possibility of smudging. Here is a super simple tutorial:

supplies for making yellow owl workshop thank you notes

You will need
:
1. Some stamps! I this Yellow Owl Workshop Many Thanks Stamp Set. Love their sets! Plus the packaging is so cute.
2. Washi tape: To close up the envelope or decorate your card if you wish.
3. Scissors
4. Notecards: I used 4bar sized folded notecards in cream.
5. Clear Embossing powder: you can get this at most craft stores in a variety of colors (even sparkly).
6. Envelopes: I used 4bar Aflap envelopes in curry from Paper-Source.
7. Some scratch paper.
8. An embossing gun. These are relatively inexpensive and you can find them at craft stores.
9. Ink pads of your choice. I used Yellow Owl colors and a few Colorbox pigments.

Time to get started! Ink your stamp by pressing it into the ink pad gently until saturated. Stamp it a few times on the scratch paper. Stamps work best when they have been used for a while, so make sure that the impression looks perfect to you.

making yellow owl workshop stamp set thank you notes practice stamping

Continue using your other stamps and colors! Make sure to clean your stamps thoroughly before pressing them into a different colored ink pad. I use windex and paper-towels, but baby wipes work very well too. Never wash stamps in water, as you may loosen the glue beneath the rubber. If you are using acrylic stamps, make sure to buy the correct cleaner to keep your stamps clean and new.

making yellow owl workshop stamp set thank you notes practice stamping

making yellow owl workshop stamp set thank you notes two colors

While the ink is still wet, pour embossing powder all over the impression. Pour the excess back into the container of powder. It's very important that you do this while the ink is wet, or it won't stick to the image. You can wait all day to actually heat it, but make sure the powder is on it when it's wet.

making yellow owl workshop stamp set thank you notes pouring embossing powder

making yellow owl workshop stamp set thank you notes dusted in embossing powder

Heat the powder with the embossing gun (staying about 6 inches away) until you can visibly see the powder melting, and becoming glossy. You will be done when there is a glossy, soft sheen on the image. Don't touch it until it's dry! If you don't have an embossing gun, I have heard of people holding paper over a stove burner to melt the powder but DO THIS AT YOUR OWN RISK. Eek! Also, a hair dryer sounds like a good idea but it's not: it just blow the powder off of your image.

making yellow owl workshop stamp set thank you notes typing on a cursive typewriter

Now write your letter! Handwritten or (in my case) typewriter-typed notes are sweet and genuine. Make sure to mention the specific gift you received, a little description of it or what you are planning to do with it, a personal sentence or two, and you're done!

making yellow owl workshop stamp set thank you notes paper source curry envelope

For a sweet touch, close the envelope with a piece of washi tape and pop in the mail. We receive mail so infrequently that even just a little note is sure to make someone's day.

making yellow owl workshop stamp set thank you notes paper source curry envelope plus washi tape

If you'd like some more stamping fun, check out this great video tutorial by our Favorite Friend, Kathryn Murray, on stamping and cleaning stamps, plus the difference between acrylic and rubber:

Rubber Stamps: Acrylic vs. Wood from Kathryn Murray Calligraphy on Vimeo.


Blogging tips