Thanksgiving is TOMORROW and we're here rounding up our very favorite Thanksgiving projects from crafty friends from around the web. We love Thanksgiving! It's the perfect time for hostessing projects, fun interaction with kids and gearing up for the December holidays. Take a look at our favorite projects below, starting with last year's Make Your Own Felt Turkey Dinner (perfect for vegetarians!) Check it out here for pattern and instructions.
Plus, here are some of our favorite projects, recipes and treats for this Thanksgiving! Start in the top left corner, and make your way clockwise for some Turkey Day fun:
1. Some of the best Clean Green Bean Casserole (vegan + paleo) that I've ever had, from Detoxinista. We made this a few nights ago as a test, and it's fabulous! Bless that nutritional yeast.
2. Make one of our favorite projects! Fun little Felted Acorns for a sweet tablescape or fun afternoon craft project.
3. Delicious-looking Swedish Cinnamon Rolls from Have a Yummy Day. The photo itself might kill me.
4. Free Thanksgiving printables for gift tags and notecards from She Wears Many Hats. So cute!!
5. We can never get enough gold--glitter up your table with this idea from A Pumpkin and a Princess.
6. More awesome printables! Animal cup cozy patterns by A Subtle Revelry. Gobble!
Have a great Thanksgiving, folks!
Images as linked above.
Showing posts with label food and recipes. Show all posts
Wednesday, November 27, 2013
Monday, October 14, 2013
Recipe: Adventures in Allergen-Free Baked Falafel!
At a wedding this weekend, I had the most delicious falafel. I have to admit that I have never had it before! However, later that night, I felt the effects of my food allergies. I was surprised that chickpeas would cause me allergy issues, but upon further investigation, I discovered raw garlic, wheat flour and canola oil in the ingredients! Dagnabbit. So, I prepared my own version of baked, allergen-free falafel. It turned out pretty well! See below for my recipe:
Ingredients:
• One 15 oz can chickpeas, drained
• 1/2 small red onion, diced
• One clove of garlic, minced (or a few shakes of garlic powder if you're sensitive to it, like me!)
• 1 tablespoons of fresh or dried parsley
• 2 tablespoons coconut or almond flour
• 2 tablespoon olive oil
• 1 teaspoon coriander
• 1 teaspoon cumin or chili powder
• 1/2 teaspoon baking powder (for those sensitive to corn, I make my own blend of baking powder using a 2:1 ratio of Cream of Tartar and Baking Soda)
• Salt and pepper to taste
Preheat your oven to 400 degrees. Combine all of your ingredients into a food processor or high-powered blender. Purée ingredients until you have a smooth, paste. On a cookie sheet, spread parchment paper or drizzle olive oil to create a non-stick surface. Spoon small, cookie-dough sized balls (about the size of a ping pong ball) onto the sheet. Bake for 10-15 minutes. Flip the falafels, then bake for 10-15 more minutes on the other side. Serve with Paleo Tzaziki sauce (see below for recipe)! Yummm.
Ingredients for Paleo Tzaziki sauce:
• 1 cup cucumber, seeded and shredded
• 1/2 cup minced red onion
• 1/2 cup full-fat coconut milk or cream (canned)
• 2 garlic cloves, crushed (or a few shakes of garlic powder if you are sensitive to it)
• 2 Tablespoons lemon juice
• 1 teaspoon dried dill
• 1/8 teaspoon sea salt
• 1/8 teaspoon black pepper
Ingredients:
• One 15 oz can chickpeas, drained
• 1/2 small red onion, diced
• One clove of garlic, minced (or a few shakes of garlic powder if you're sensitive to it, like me!)
• 1 tablespoons of fresh or dried parsley
• 2 tablespoons coconut or almond flour
• 2 tablespoon olive oil
• 1 teaspoon coriander
• 1 teaspoon cumin or chili powder
• 1/2 teaspoon baking powder (for those sensitive to corn, I make my own blend of baking powder using a 2:1 ratio of Cream of Tartar and Baking Soda)
• Salt and pepper to taste
Preheat your oven to 400 degrees. Combine all of your ingredients into a food processor or high-powered blender. Purée ingredients until you have a smooth, paste. On a cookie sheet, spread parchment paper or drizzle olive oil to create a non-stick surface. Spoon small, cookie-dough sized balls (about the size of a ping pong ball) onto the sheet. Bake for 10-15 minutes. Flip the falafels, then bake for 10-15 more minutes on the other side. Serve with Paleo Tzaziki sauce (see below for recipe)! Yummm.
Ingredients for Paleo Tzaziki sauce:
• 1 cup cucumber, seeded and shredded
• 1/2 cup minced red onion
• 1/2 cup full-fat coconut milk or cream (canned)
• 2 garlic cloves, crushed (or a few shakes of garlic powder if you are sensitive to it)
• 2 Tablespoons lemon juice
• 1 teaspoon dried dill
• 1/8 teaspoon sea salt
• 1/8 teaspoon black pepper
Monday, August 26, 2013
Allergen-Free Coconut Banana Bread: Free of Gluten, Sugar, Grains, Dairy, Eggs, Nuts and Soy
I will never stop craving the beauty that is wheat artisan bread, dipped in salty olive oil with a side of cheese. Oh my. In the meantime, while I'm still chained to this allergen diet, I found a way to make an egg-free, gluten-free, grain-free, dairy-free, nut-free, AND soy-free bread. Phew. That is a mouthful. I adjusted a recipe that I found here on Gutsy to be dairy and egg free. Here's how to follow my version:

Ingredients:
• 1 Cup sifted Coconut Flour
• 3 very ripe bananas
• 4 flax eggs (or regular eggs if you aren't avoiding them) I detail this process below.
• 6 tablespoons of melted coconut oil (or butter if you aren't avoiding it)
• 5 tablespoons raw honey
• 1/4 teaspoon sea salt
• 2 teaspoons cinnamon
• 1/2 teaspoon baking soda
• 1 tablespoon vanilla

Smash up your riped bananas until they are a smooth consistency.
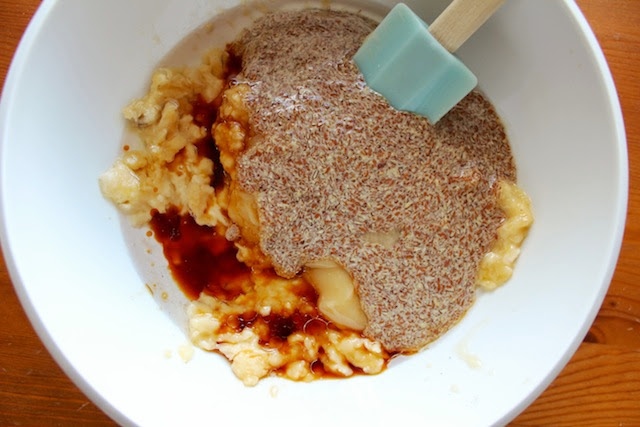
Add your liquid ingredients: coconut oil, flax eggs, raw honey and vanilla and stir minimally.


In a separate bowl, add your dry ingredients together: sifted coconut flour, baking
soda, cinnamon, and salt. Stir gently together, then add the dry ingredients to the wet.

With a wooden spoon, stir all ingredients together until nicely blended. Don't over-stir.

Spread your mixture into a greased or parchment-lined bread pan and bake for 1 hour and 15 minutes at 300°. After removing from the oven, let the bread sit in the pan on the stove for 15 additional minutes.

Serve with your favorite spread or salted olive oil. 
The reason my bread is so flat is because of the flax eggs in a wide bread pan. A mini bread pan would probably have been a better choice if I had had one. Here's how to make a flax egg:
Ingredients:
• One small mixing bowl
• A small whisk
• 1 tablespoon of Flaxseed Meal seed to 3 tablespoons of water. So for 4 flax eggs, you will need 4 tablespoons of Flaxseed meal and 3/4 cup of water (that's 12 tablespoons).

One mistake I made in this recipe was not grinding my flax meal. I used the Bob's Red Mill Flaxseed Meal in a hurry which should be further ground into a powder in a coffee grinder or grain mill.
Instructions: After measuring your tablespoons of flax meal, add the water slowly while stirring with the whisk gently. Put your bowl of "eggs" in the refrigerator for at least 15 minutes. It should set nicely to create an egg-like consistency, which will act as your binder. Enjoy!


Ingredients:
• 1 Cup sifted Coconut Flour
• 3 very ripe bananas
• 4 flax eggs (or regular eggs if you aren't avoiding them) I detail this process below.
• 6 tablespoons of melted coconut oil (or butter if you aren't avoiding it)
• 5 tablespoons raw honey
• 1/4 teaspoon sea salt
• 2 teaspoons cinnamon
• 1/2 teaspoon baking soda
• 1 tablespoon vanilla
Add your liquid ingredients: coconut oil, flax eggs, raw honey and vanilla and stir minimally.


soda, cinnamon, and salt. Stir gently together, then add the dry ingredients to the wet.


The reason my bread is so flat is because of the flax eggs in a wide bread pan. A mini bread pan would probably have been a better choice if I had had one. Here's how to make a flax egg:
Ingredients:
• One small mixing bowl
• A small whisk
• 1 tablespoon of Flaxseed Meal seed to 3 tablespoons of water. So for 4 flax eggs, you will need 4 tablespoons of Flaxseed meal and 3/4 cup of water (that's 12 tablespoons).

One mistake I made in this recipe was not grinding my flax meal. I used the Bob's Red Mill Flaxseed Meal in a hurry which should be further ground into a powder in a coffee grinder or grain mill.
Instructions: After measuring your tablespoons of flax meal, add the water slowly while stirring with the whisk gently. Put your bowl of "eggs" in the refrigerator for at least 15 minutes. It should set nicely to create an egg-like consistency, which will act as your binder. Enjoy!

Thursday, August 1, 2013
Recipe: Sweet Potato Chips
Chips and guacamole is my favorite snack of all time. I don't think I can really live without it, so that was my first priority on this crazy allergen-free diet. How can I solve this debaucle if I can't eat corn, tomato, wheat or white potato? Sweet potato chips! With tomato-free guacamole. Yessss. Here's what you'll need:

Ingredients:
• 2 sweet potatoes (not yams--they really are different, I just learned)
• Olive oil, canola or coconut oil cooking spray (you can drizzle as well, but I found that the spray works to evenly and lightly distribute)
• Salt & pepper

Start by slicing the sweet potatoes into thin slices, about 1/8 inch thick. If you have a mandolin, you can use that or you can use a really sharp knife. Watch your fingers!

Spread the slices out onto a sheet on parchment paper. You definitely don't want these to stick to the pan. Spray the slices with the oil of your choice (try to make sure that there isn't too much overlapping, or they won't bake correctly) and sprinkle with salt and pepper.

Bake at 375° for 12 minutes, then flip. Bake for 12 more minutes, until edges are crispy, and you're done! As for the guacamole, follow my Easy Peasy Quickie Guacamole recipe! I've added red onion and lime in the tomato's absence. Enjoy!
Ingredients:
• 2 sweet potatoes (not yams--they really are different, I just learned)
• Olive oil, canola or coconut oil cooking spray (you can drizzle as well, but I found that the spray works to evenly and lightly distribute)
• Salt & pepper
Start by slicing the sweet potatoes into thin slices, about 1/8 inch thick. If you have a mandolin, you can use that or you can use a really sharp knife. Watch your fingers!
Spread the slices out onto a sheet on parchment paper. You definitely don't want these to stick to the pan. Spray the slices with the oil of your choice (try to make sure that there isn't too much overlapping, or they won't bake correctly) and sprinkle with salt and pepper.
Bake at 375° for 12 minutes, then flip. Bake for 12 more minutes, until edges are crispy, and you're done! As for the guacamole, follow my Easy Peasy Quickie Guacamole recipe! I've added red onion and lime in the tomato's absence. Enjoy!
Tuesday, July 30, 2013
Goodbye Delicious Food: Andie's Last Meal
Recently, I was diagnosed with some pretty severe allergies. To make a long story short, in fear of boring the pants off of you: I have had dermatographism (aka "skin writing") since I was 11 years old. It's not as bad as it sounds! In short, any touch, scratch, bump, etc., to my skin leaves an itchy welt as the histamines in my skin overreact to the stimulus. However, with antihistamines I'm usually good to go!

For my birthday, I got myself Gwyneth Paltrow's new book, It's All Good, and made a recipe that just happened to be free of most of the allergens I am affected by (I now know). I woke up feeling way better than I ever have before. Hmm...maybe I'm onto something!
The short list after a naturopathic allergy blood panel revealed allergies to: grains, gluten, soy, dairy, eggs, chicken, corn, grape, some nightshades, beef and a host of other weird little tidbits. Yay! I win the high score! Not to worry: I've been told that after some diet healing, I may be able to add some of those things back into my diet (please, let it be wine!) In the meantime, my recipes on the Assemble blog may look a bit different--and ridiculously allergen free.
However, a last treat was in order. The sous chef at Tulio downtown, (4.2 stars!) invited Christian and I to come and sit at the chef's counter and be treated to a delicious "last" meal. It's a rare occasion that we get to go to super nice restaurants, so we jumped at the chance and absolutely loved being Tulio's guests. Here's what I got to partake in for my last meal:

Two glasses of an absolutely heavenly Chianti, Tenuta Santedame, '08. Focaccia and prosciutto with Truffle oil and Bel Paese cheese, and I believe a French Onion soup of some kind--I was too busy shoving spoonfuls into my mouth to remember. Second, a little antipasti plate that I again wasn't listening to. Here's what I think it was: awesome meat, awesome cheese and awesome, salty bread.

Next up (I remember this one, for sure) was a Risotto with morel mushrooms, bone marrow butter and parmesan. Followed by the Sweet Potato Gnocchi with sage butter and mascarpone (I think this was my favorite) with the Panzoti: taleggio, mascarpone, ricotta, corn, padron peppers, leeks, and butter. And yes, I even ate that pepper.

Last, but absolutely not least, we shared the Ribeye (yes, that's HALF of it) with wood oven roasted mushrooms panzanella, sweet onion, rosemary oil and sea salt. Then a quick Lemon sorbet, because I could honestly not fit anything else in.
Oh my, yes that happened. If you're up for some seriously fine dining, I highly recommend checking it out. I'll even come with you, and eat lettuce leaves. Make sure to grab some of that sweet potato gnocchi--I think that was definitely the favorite. However, I think I'm set for quite a while. Thanks, Tulio!
For my birthday, I got myself Gwyneth Paltrow's new book, It's All Good, and made a recipe that just happened to be free of most of the allergens I am affected by (I now know). I woke up feeling way better than I ever have before. Hmm...maybe I'm onto something!
The short list after a naturopathic allergy blood panel revealed allergies to: grains, gluten, soy, dairy, eggs, chicken, corn, grape, some nightshades, beef and a host of other weird little tidbits. Yay! I win the high score! Not to worry: I've been told that after some diet healing, I may be able to add some of those things back into my diet (please, let it be wine!) In the meantime, my recipes on the Assemble blog may look a bit different--and ridiculously allergen free.
However, a last treat was in order. The sous chef at Tulio downtown, (4.2 stars!) invited Christian and I to come and sit at the chef's counter and be treated to a delicious "last" meal. It's a rare occasion that we get to go to super nice restaurants, so we jumped at the chance and absolutely loved being Tulio's guests. Here's what I got to partake in for my last meal:
Oh my, yes that happened. If you're up for some seriously fine dining, I highly recommend checking it out. I'll even come with you, and eat lettuce leaves. Make sure to grab some of that sweet potato gnocchi--I think that was definitely the favorite. However, I think I'm set for quite a while. Thanks, Tulio!
Monday, July 1, 2013
The Weekly Chop for Quick & Easy, Healthy Meals
Do you guys have weekly routines that help you stay on top of household chores, cooking, etc? I do, and I like to call it my "weekly chop." I'm one of those people that gets ravenously hungry at a moment's notice--and that's not good if you want to stay healthy. I end up grabbing chips or string cheese or a handful of chocolate chips when I'm not prepared. So--I do the chop. Not pictured: chopped mushrooms, shredded lettuce, avocados & cucumbers (if you pre-chop, drizzle with lemon), grape tomatoes, and baby spinach (bagged with lemon wedge for freshness).
The variety of vegetables I chop for the week is forever changing, but I have a few staples that I always get ready for the week: White and red onion, a variety of colors of sweet peppers, and smashed/cooked carrots to add to Grady's dog food. Chopping onions is not a favorite activity of mine because I have sensitive eyes, so I like to chop them all at once and be done with it. I get a mini fan, point it at my cutting board and have at it! Veggie wonderfulness for an entire week! They live in our refrigerator in tupperware cases with washi tape labels.
Here are a few of my favorite super easy recipes that you can grab a bunch of pre-chopped veggies and eat quickly (and one to make for your furry friend):
• Scrambled eggs with peppers, baby spinach and fat-free feta (add mushrooms too for a scrambled version of my favorite omelette).
• Easy peasy quickie guacamole recipe with red onion.
• Sautéed white onion with meat and veggies of your choice with olive oil and sea salt.
• A bright salad with romaine lettuce, cucumbers, carrots, grape tomatoes, red onion, sweet peppers and tart dried cherries, with a bit of Michelle's homemade vinaigrette dressing.
• Black bean tacos with onions, red peppers, tomatoes and greek yogurt.
• And for the pups with sensitive tummies or food allergies! Smashed carrots with canned rabbit, eggshell calcium and brown rice. (Talk to your vet first, though!)
Tuesday, May 7, 2013
After-Workout 200-Calorie Omelette
I don't know about you, but after a good run, I'm STARVING. This past weekend, I took a quick trip to Washington DC for my sister-in-law's baby shower, and she made me quite possibly the most delicious omelette I have ever tasted. And--to top it all off, it was quite healthy! I thought I'd share this super-fuel, easy-to-make, post-workout-breakfast with all of you!

Click below to read the rest:
Friday, April 26, 2013
Assemble recipe: Summer Crackers [oh yeahhh...]
If you read our former Neatloaf blog, then you may have seen (or even made) this wonderful treat. My mom made these for me as a kid, every summer whenever we went to the beach. I have a feeling that the only reason she always brought these is because they are already crunchy, and we wouldn't realize we may be eating some sand here and there...I digress. Anyone who falls prey to a taste-test is immediately addicted. I encourage you to make this marvelous, easy recipe this weekend and enjoy with a glass of spiked lemonade and hopefully a sun break or two.

Ingredients:
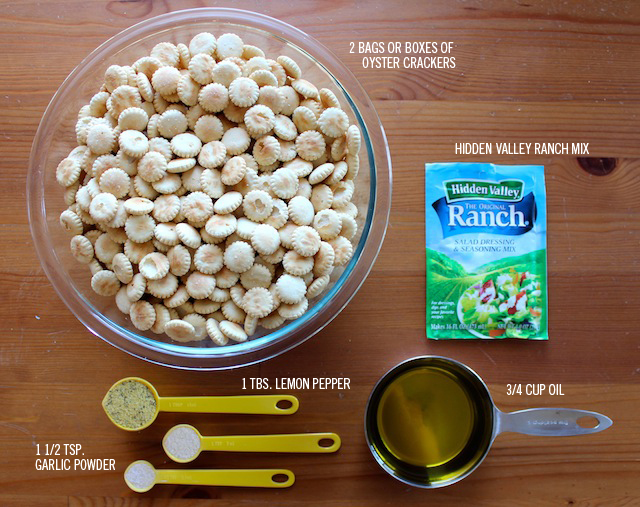
• 2 boxes or bags of oyster crackers
• 1 small package of Hidden Valley Ranch dry/powdered dressing
• 3/4 cup vegetable oil or olive oil (olive oil can sometimes overpower the spices but is better for you)
• between 1/2 teaspoon-1 tablespoon (according to taste--see photo for my recommendation) garlic powder
• between 1/2 teaspoon-1 tablespoon (according to taste--see photo for my recommendation) lemon pepper
Place crackers in large bowl with lid and then add spices. Pour oil over the top, stirring gently between pours. Mix well to coat. Put lid on bowl and shake until all spices are mixed into crackers. Keeps about 2 weeks in Tupperware, and are even better on the second day!
Here are some more summer snack recipes. Enjoy!
Baked Kale Chips
Home Canned Garlic Dill Pickles
Tartines with Mozzarella, Basil and Nectarines
Raspberry Brie Panini
mmmmm!! Have a good weekend!


Ingredients:
• 2 boxes or bags of oyster crackers
• 1 small package of Hidden Valley Ranch dry/powdered dressing
• 3/4 cup vegetable oil or olive oil (olive oil can sometimes overpower the spices but is better for you)
• between 1/2 teaspoon-1 tablespoon (according to taste--see photo for my recommendation) garlic powder
• between 1/2 teaspoon-1 tablespoon (according to taste--see photo for my recommendation) lemon pepper
Place crackers in large bowl with lid and then add spices. Pour oil over the top, stirring gently between pours. Mix well to coat. Put lid on bowl and shake until all spices are mixed into crackers. Keeps about 2 weeks in Tupperware, and are even better on the second day!
Here are some more summer snack recipes. Enjoy!
Baked Kale Chips
Home Canned Garlic Dill Pickles
Tartines with Mozzarella, Basil and Nectarines
Raspberry Brie Panini
mmmmm!! Have a good weekend!
Wednesday, April 3, 2013
Spring Recipe: Ronda's Mediterranean Pasta Salad
Ingredients:
1. 1 bag of Penne or Pennetta white pasta
2. 1 small container of low-fat feta
3. 1 small crate of grape tomatoes or 3 large tomatoes
4. 1/2 red onion
5. 2 dashes Tobasco or hot sauce
6. 3 tablespoons red wine vinegar
7. 1/3 cup olive oil
8. 1 teaspoon salt (pepper to taste)
9. Several leaves of fresh basil or about 1.5 tablespoons dry crushed basil
Ronda is my mom--and she is quite the amazing chef. This was always my favorite dish that she made, and is now my husband's favorite. Seattle had its first few extra sunny & warm days last weekend, which led him to ask for his favorite spring/summer meal. Enjoy!
Fully cook and shock the pasta with cold water, then put in a large bowl to the side. Slice the grape or cherry tomatoes in half, then chop the red onion into small, bits.
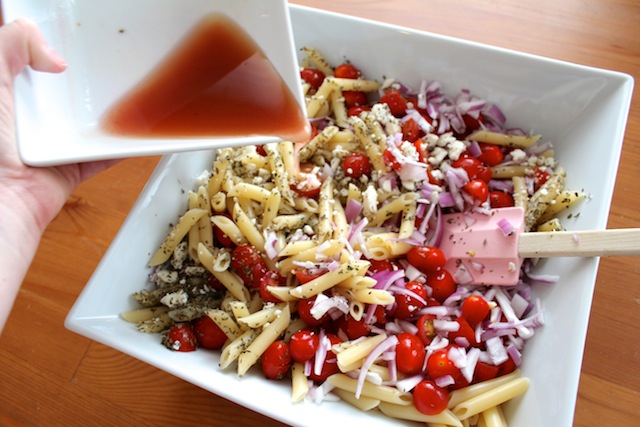
To make the dressing, combine the oil, vinegar, salt, hot sauce and pepper into a bowl. Whisk until completely blended.
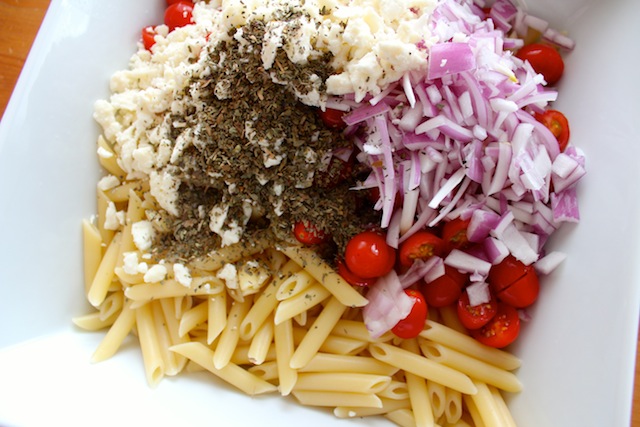
In the large bowl with the pasta, combine the onion, tomatoes, basil and feta. Stir together, then drizzle the dressing over the salad, while stirring.
There you have it! Serve warm with sea salt and a glass of crisp Prosecco for an authentic Italian lunch!
Thursday, February 28, 2013
Recipe: A Super-Easy 220 Calorie Berry Medley Smoothie to Start Your Day
You will need:
1. 1/4 cup orange juice
2. 1/8 cup nonfat Greek Yogurt
3. 1 cup of frozen berry medley
4. 1/4 cup of baby spinach leaves
5. 1/2 cup nonfat milk

This one's so easy, I barely need bullet points!
• Defrost your berries in the microwave for about 2 minutes. You want them to be still a bit frozen so that your smoothie is icy and cool.
• Add ingredients, blend & serve! mmmm! (Double the ingredients for two!)
Images: Andie Powers
Wednesday, February 20, 2013
National Cherry Pie Day!

It's National Cherry Pie Day! We wanted to re-share our favorite Cherry Pie recipe for the occasion. Yum, yum!!
Andie's Baked Cherry Cream Pie
Ingredients:
• 2 homemade -or- store-bought pie crusts of your choice
• 2 cans of cherry pie filling -or- 2 lbs of pitted cherries
• 1/4 cup of sugar if using filling, 3/4 cup sugar if using fresh cherries
• 1/2 tsp. ground cinnamon
• 1/4 tsp. salt
• 1 cup heavy -or- whipping cream
• 3 egg yolks (save the whites)
- Heat the oven to 450° (or degree pertaining to your specific pie crust recipe).
- Line the bottom of a 9 inch pie pan with one sheet of pie crust, and lay a sheet parchment paper in the bottom, on top of the crust. Use pie weights or rice to weigh the crust down, and pre-bake for about 10-15 minutes.
To make the filling:
- If you are using fresh, pitted cherries, cut them in half and put them in a medium saucepan with about 1/4 cup water and bring to a boil over high heat. Reduce the heat to medium and cook until the cherries are steamed well, about ten minutes. Remove the heat and mash them into a lumpy, puree. Add the sugar, cinnamon and salt, and stir to mix well. Place in a cool bowl.
- If you are using cherry pie filling, put the filling into a colander and shake over the sink, to get as much of that oozey (and delicious) liquid out. Do this for about five-ten minutes. Once complete, put the filling into a large mixing bowl, and add the sugar, cinnamon and salt, and stir to mix well. (Remember you will be using less sugar with the store-bought filling).
- In another bowl, combine the cream and egg yolks and stir with a whisk or fork to combine.
- Add this mixture to your pie filling, and mix until blended.
To finish:
- Pour the filling into your pre-baked pie crust (you may have a bit left over, just put that to the side for ice cream toppings!)
- Place your second crust over the top, crimp edges together and decorate as you wish.
- Use the remaining egg whites and brush over the top of the crust, until shiny. This will give you a golden brown finish.
- Bake the pie for about 20-25 minutes or until golden brown on top.
- Cool on a rack or tea towel and serve!
mmmm. Eat itttt!
Monday, February 11, 2013
Recipe: How to Make French Macarons with Buttercream Filling
This was my first foray into baking the macaron, and I have to say that I'm ridiculously proud of myself. I had heard that macarons were a difficult prize for pastry chefs, and perhaps I just got lucky: but these worked out! I got my cookie recipe from the lovely book, I ♥ Macarons by Hisako Ogita and my buttercream recipe is the one that I have perfected over the years (born during the cake decorating class that Emily and I took together in the beginning of our friendship in 2007). Awww. I'd love to share, and hope you send us photos of your Macaron adventures!

You will need:
1. Parchment paper
2. A nice rubber spatula
3. A flour sifter
4. 2/3 cup almond meal/flour (watch out! This stuff is expensive!)
5. 1 1/2 cup powdered sugar.
6. 3 egg whites
7. 5 tablespoons of white, granulated sugar
8. A pastry/frosting bag and circular tip, about 1/4 inch
9. 1 teaspoon vanilla extract
10. Food coloring and toothpick to administer (for batter or buttercream)

Set your oven to 375° and ready two cookie sheets. On your parchment paper, draw 1 inch circles, about an inch apart from each other. If you're confident in your pastry bag skills, you can skip this step. However...I was not.
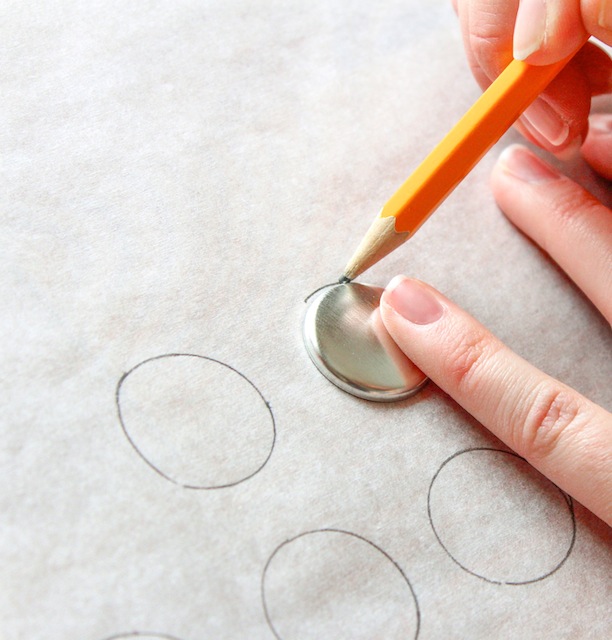
Combine your almond flour and powdered sugar in a sifter and sift until you have a nice, pretty pile. Set to the side.


In a mixing bowl, beat your egg whites with an electric mixer until nice and foamy. Gradually add the granulated sugar until they develop stiff, glossy peaks. (Sidenote: use your leftover egg yolks as a face mask. This is an Indian beauty tradition--massage egg yolks into clean skin and let sit for 5-10 minutes, or until you can't smile without cracking it. Then rinse with warm water and a washcloth. Perfect, supple skin).

Add vanilla and mix gently. If the mixture gets a little soupy, mix on high with the electric mixer again for about a minute on high speed.


After the meringue is stiff and glossy, add about half of the flour/sugar mixture and stir with your spatula until mixed. Add the rest and stir again. Next is the macaronage process: stir until the mixture is even, then spread the batter against the sides of the bowl, then flip over and repeat. Do this for several minutes--around 15 revolutions. Here is a great video that demonstrates the technique. The batter is done when it slowly "glops" off of your spatula.

Next, fill your pastry bag with the batter (remember to twist or clip the top or you'll have batter all over your hands like me!) Squeeze the bag to fill each circle. Stop when you reach the end of your pencil marks--the batter will spread wider and it will be the perfect size.
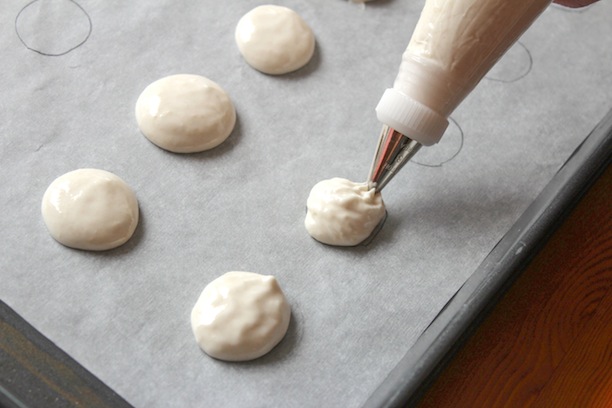
Some French pastry chefs believe that this is the most important step in making a macaron: as soon as you are finished filling your tray with little dots of macaron batter, rap the cookie sheet against a hard service several times. This will set the pied or little pastry lip at the base of the cookie (an essential for an authentic macaron). Set your tray to the side and allow to dry for about thirty minutes. After thirty minutes, gently tap the surface of one of the dots of batter. If it does not stick to your finger, it's ready for baking. If it does, allow a bit more time.

While you're waiting for the macaron batter to dry, let's make the buttercream.
You will need:
• 1 stick of softened butter (8 tablespoons)
• about 5 ounces of powdered sugar, or 2/3 cup (have a bit on hand to add if it is too runny)
• about 1/8 teaspoon of vanilla extract

Stir all of these ingredients together until you have a light, tasty paste. Then add a touch of food coloring if you would like some color. I chose red for a nice Valentine's Day treat! There are a variety of flavors that you can add to all buttercreams and macaron batter, but for my first try, I decided to keep it simple.

After your macaron batter is dry, stack your cookie sheet onto the second cookie sheet to ready it for baking. Using two cookie sheets will keep the bottoms of your macarons from burning. Place in the oven for about 8 minutes. After 8 minutes, turn the sheet so that the front-facing macarons are now towards the back of the oven for an even bake. If after 16 minutes, they are still super-soft, reduce heat to 325°, cover in aluminum foil and bake for 2 more minutes. Only bake ONE sheet of macarons at a time.

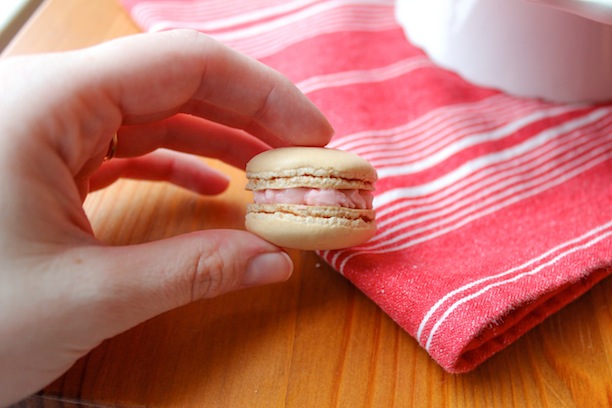
When the macarons are done baking, take them out of the oven and let sit until relatively cool, then very carefully peel them from the parchment paper. Fill a new pastry bag (or wash the old one) with the buttercream and create about 1/2 inch dot on one macaron cookie, then sandwich another on top. Be careful not to squeeze the buttercream out on the sides.


A macaron! Or many! They are definitely better on the second day, as the butter has a chance to seep just a bit into the cookie and soften it. Delightful! Please let me know how you do, I thought that this was so much fun. Good luck!

You will need:
1. Parchment paper
2. A nice rubber spatula
3. A flour sifter
4. 2/3 cup almond meal/flour (watch out! This stuff is expensive!)
5. 1 1/2 cup powdered sugar.
6. 3 egg whites
7. 5 tablespoons of white, granulated sugar
8. A pastry/frosting bag and circular tip, about 1/4 inch
9. 1 teaspoon vanilla extract
10. Food coloring and toothpick to administer (for batter or buttercream)

Set your oven to 375° and ready two cookie sheets. On your parchment paper, draw 1 inch circles, about an inch apart from each other. If you're confident in your pastry bag skills, you can skip this step. However...I was not.

Combine your almond flour and powdered sugar in a sifter and sift until you have a nice, pretty pile. Set to the side.


In a mixing bowl, beat your egg whites with an electric mixer until nice and foamy. Gradually add the granulated sugar until they develop stiff, glossy peaks. (Sidenote: use your leftover egg yolks as a face mask. This is an Indian beauty tradition--massage egg yolks into clean skin and let sit for 5-10 minutes, or until you can't smile without cracking it. Then rinse with warm water and a washcloth. Perfect, supple skin).

Add vanilla and mix gently. If the mixture gets a little soupy, mix on high with the electric mixer again for about a minute on high speed.


After the meringue is stiff and glossy, add about half of the flour/sugar mixture and stir with your spatula until mixed. Add the rest and stir again. Next is the macaronage process: stir until the mixture is even, then spread the batter against the sides of the bowl, then flip over and repeat. Do this for several minutes--around 15 revolutions. Here is a great video that demonstrates the technique. The batter is done when it slowly "glops" off of your spatula.

Next, fill your pastry bag with the batter (remember to twist or clip the top or you'll have batter all over your hands like me!) Squeeze the bag to fill each circle. Stop when you reach the end of your pencil marks--the batter will spread wider and it will be the perfect size.

Some French pastry chefs believe that this is the most important step in making a macaron: as soon as you are finished filling your tray with little dots of macaron batter, rap the cookie sheet against a hard service several times. This will set the pied or little pastry lip at the base of the cookie (an essential for an authentic macaron). Set your tray to the side and allow to dry for about thirty minutes. After thirty minutes, gently tap the surface of one of the dots of batter. If it does not stick to your finger, it's ready for baking. If it does, allow a bit more time.

While you're waiting for the macaron batter to dry, let's make the buttercream.
You will need:
• 1 stick of softened butter (8 tablespoons)
• about 5 ounces of powdered sugar, or 2/3 cup (have a bit on hand to add if it is too runny)
• about 1/8 teaspoon of vanilla extract

Stir all of these ingredients together until you have a light, tasty paste. Then add a touch of food coloring if you would like some color. I chose red for a nice Valentine's Day treat! There are a variety of flavors that you can add to all buttercreams and macaron batter, but for my first try, I decided to keep it simple.

After your macaron batter is dry, stack your cookie sheet onto the second cookie sheet to ready it for baking. Using two cookie sheets will keep the bottoms of your macarons from burning. Place in the oven for about 8 minutes. After 8 minutes, turn the sheet so that the front-facing macarons are now towards the back of the oven for an even bake. If after 16 minutes, they are still super-soft, reduce heat to 325°, cover in aluminum foil and bake for 2 more minutes. Only bake ONE sheet of macarons at a time.

When the macarons are done baking, take them out of the oven and let sit until relatively cool, then very carefully peel them from the parchment paper. Fill a new pastry bag (or wash the old one) with the buttercream and create about 1/2 inch dot on one macaron cookie, then sandwich another on top. Be careful not to squeeze the buttercream out on the sides.


A macaron! Or many! They are definitely better on the second day, as the butter has a chance to seep just a bit into the cookie and soften it. Delightful! Please let me know how you do, I thought that this was so much fun. Good luck!

Subscribe to:
Posts (Atom)