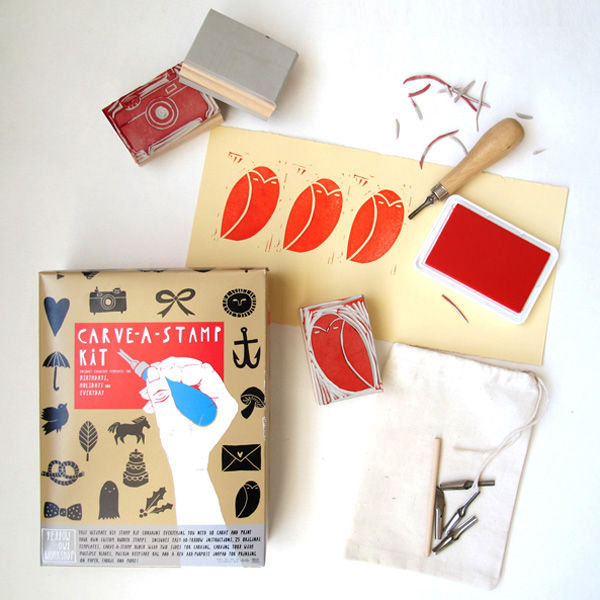
Showing posts with label linoleum block. Show all posts

Monday, March 3, 2014

Crafty Project: Linoleum Block-Printed Geometric Onesie

The babies are coming--so many babies! Last week, we were given a few onesies that we were to decorate for a friend's brand new baby! He was coming soon (about two days after the shower!) so we needed a quick decor option and not a lot of fuss: linoleum blocks it is! We did a full tutorial on linoleum block printing last year, so definitely refer to those instructions if you are starting from scratch.


You will need:
• a linoleum block
• several onesies (in case you mess up)
• an ink brayer
• fabric ink (I used my old gocco fabric ink)
• a surface to pull ink--I used an acrylic sheet
• a pencil
• linoleum cutter
• not pictured--an iron and several sheets of paper to iron over


First, draw your design onto your linoleum block. It doesn't matter if you mess up (see my weird floating triangle in there?) the cutting is what really matters.


When you have your design exactly how you want it, use a "small V" cutting attachment to go around your design lines. Once you've cut your lines, use a larger "U" to dig out the areas that you do not want to stamp. I even used the knife portion of the cutting tool to remove full areas that I did not need, which is up to you!


After you are finished carving your stamp, pull some of the ink with the brayer until it is evenly spread onto the roller. Lightly roll over your stamp (or if you are using an ink pad, pat the stamp against the pad) in order to see any mistakes you might need to remove on the stamp.


After you're finished making sure your stamp is cut perfectly, stamp a few times on a sheet of paper or a loose piece of fabric to test. If the impression is to your liking, prepare your onesie by placing a thick piece of card stock or an acrylic sheet (as shown here) inside the onesie to protect the back from getting ink on it.


(I also taped the sleeves and sides to the table in order to avoid any wrinkling.)


When you're ready to stamp, pull a thin layer of ink over your stamp and press it to your surface. Create your design and allow the fabric to dry. Once the impressions are dry, remove your acrylic sheet (if you used paper, you may leave it in there), and cover the design with a sheet of paper. Iron on high heat for about one minute to set the design.


Now you're all finished! Wrap that gift up (a onesie with a funsie for big sis) with some baker's twine and you're all set! Thanks to Madi and Sarah for the onesies and lovely shower to Jaqui (and baby Enzo).


Tuesday, May 21, 2013

Crafty Project: Linoleum Block Stamps

We're getting all ready for our Madewell event this coming Thursday, where we will be making custom linoleum block stamps (+ shopping + snacking!) While we were making up some super-secret samples for Thursday, we decided to make another quick one to show you what we're going to be doing on Thursday with Madewell.

how to make a linoleum block stamp tutorial

In honor of my nephew (being born on Thursday!), we made a little dinosaur stamps. He's a fan of dinosaurs...we've decided..? Check out the steps below and get ready for Thursday!

how to make a linoleum block stamp tutorial

You will need:
• ink or pigment
• a linoleum block
• a linoleum carving tool
• an image of your choice
• pencil
• tape
• paper to print on

how to make a linoleum block stamp tutorial
Print or draw your image on a piece of regular or tracing paper. Make sure to draw all text backwards. Flip the image over, and color (especially over lines) with your pencil.
how to make a linoleum block stamp tutorial
Turn the image back right side up, and tape to the linoleum block. Use a toothpick or a sharp pencil (careful not to tear through the paper) and trace your image.
how to make a linoleum block stamp tutorial
Peel the image off of the linoleum block. You should have a result something like the above.
how to make a linoleum block stamp tutorial
Begin gently carving around the edges of your image. Outline the entire image before deep carving. A light touch will help with small details.
how to make a linoleum block stamp tutorial
When your outline is complete, begin carving away the negative space on the stamp. Get rid of anything that you don't want to see in your imprint with your carving tool.
how to make a linoleum block stamp tutorial
When you think you are close to being complete, ink up your image and note which pieces of negative space are also inked. Continue to carve until only the image you want to imprint is inked. Then, make a few practice impressions and adjust your block with the carving tool until it is to your liking. And there you have it! Your very own stamp!
how to make a linoleum block stamp tutorial

Tuesday, May 14, 2013

Product Love: Carve a Stamp, Y'all!

I apologize for the y'all. However--we are going stamp-raving-nuts over here at Assemble, working on our Kickstarter. We're getting all those stampy files ready for the stampy plate makers and the stampy rubber makers. It's so exciting! We've got so many goodies coming to all of our backers soon!

However, we aren't the only ones making great stampy kits. We are absolutely in love with this Carve a Stamp Kit from our friends at Yellow Owl Workshop.

carve a stamp kit by yellow owl workshop
Look at the templates!!! Ack!!

Similar to our old Carve a Linoleum Block Stamp workshop, this kit has all that you need to make your own stamps, like:
• Easy to follow instructions
• 25 templates
• Block with two sides for carving
• Carving tool with multiple blades
• All purpose ink pad

We don't carry it in our shop--yet--but you can always pick it up directly from Yellow Owl Workshop or check out all of their other awesome products in our shop. We just were really excited about such an awesome kit--we love kits! And we love Yellow Owl!

Images via Yellow Owl Workshop
Blogging tips