Showing posts with label ornaments. Show all posts
Showing posts with label ornaments. Show all posts
Thursday, December 12, 2013
Crafty Project: Painted Holiday Globe Ornaments
I have to say that my tree is usually a bit less traditional than most. I love fake white trees, twinkly white lights and a non-traditional color scheme. That being said, I can never find glass, globe ornaments that I like because they are usually silver, gold, blue, red or green. And those colors are great--but sometimes, you just want to mix it up. So, we decided to do a fun (and very easy!) project for creating your own Christmas bulb ornaments in any color. Super inexpensive, quick and easy enough to do during a free hour. Weee!
You will need:
• A package of inexpensive, plain glass bulb ornaments
• Acrylic craft paint in colors of your choice
• Dixie cups or several cut bottoms of old plastic bottles (for draining), small enough to hold the bulb
• A small amount of water if your paint is very thick
• Paper towels
First thing's first: pop off the top of your ornament and place to the side. (You won't want to lose those!) Then, squirt a small amount of the paint of your choice into the bulb and proceed to roll it back and forth in your hand to cover the glass. You can always add more paint.
After coating the entire inside of the bulb, place it in your dixie cup or half-bottle container and allow the excess paint to drip out. I let these sit for about 6-8 hours. After they sit in the drip containers for a while, remove the ornaments and set them securely on a paper towel to continue drying. I would recommend overnight, if not longer.
Another fun thing to try is mixing colors. If you want a more brushed look, fill the ornament with both colors of paint at the same time, leaving each enough room to drip out. If you want a more modern, color-blocked look, wait for one color to dry, then add the other color. I used the aqua and gray brushed texture. Fun!
After the paint is dry, pop the metal top back on the ornaments and then insert the metal hook rungs. You always want to place the metal top on before inserting the hook, because the metal pieces rungs can scratch the paint on the inside of the ornament. And there you have it! Hang them on your tree or give them away as gifts!
Tuesday, December 11, 2012
Crafty Project: In-the-Round Crocheted Ornaments
We've got a great DIY for holiday activities (or just for yourself!): crocheted ornaments. This is an easy way to use up scrap yarn and adorn your tree, top a gift, or deck the halls!
*A note about the project
This is an intermediate level crochet project, so the directions below do not include our basic tutorial. But for all you beginning crocheters, Assemble will be launching our Crocheted Granny Square Kit THIS FRIDAY, which includes full directions, diagrams and all materials. These ornaments are a modified version of our granny square pattern!

Materials
1. 3.5 mm crochet hook
2. Baby or sport weight yarn in several colors
+ Scissors

ROUND ONE
Start with a loose slip knot.
Chain 5.
Connect last chain to slip stitch to create a circle.
Chain 4.
Double Crochet through the center of the circle, then Chain 1.
Repeat DC, CH1 for a total of 12 spokes through the center of the circle.
Complete round by connecting yarn to the first spoke, in the third chain up, with a slip stitch.
ROUND TWO
In the chain space between the first two round one spokes, add a new color with a slip stitch. Chain 3 (counts as a DC) and then Double Crochet. Chain 1.
In the next space between spokes, DC twice then Chain 1.
Repeat DC2, then CH1 between all 12 spokes of round one.
Complete round by connecting yarn to the first spoke, in the third chain up, with a slip stitch. Cut yarn, leaving a 3" tail and tighten.

ROUND THREE
In the chain space between DCs of round two, add a new color with a slip stitch. Chain 3 (counts as a DC) then Double Crochet. Chain 2.
In the next space between sets of DCs, DC2 then CH2.
Repeat DC2, then CH2 between all 12 sets of round two.
Complete round by connecting yarn to the first spoke, in the third chain up, with a slip stitch. Cut yarn, leaving a 3" tail and tighten.
ROUND FOUR - Scallop
In the double chain space between sets of DCs of round three, add a new color with a slip stitch. Chain 3 (counts as a DC) then DC3 in the same space for a total of 4 double crochets.
Single crochet in the middle of the next set of DCs.
DC4 in the next double chain space.
SC inbetween the next set of DCs from round three.
Repeat until scallop is complete, and connect where you began. Cut yarn, leaving a 3" tail and tighten.
ADD CHAIN LOOP
Chain 8 to 12 chains out from the perimeter of the ornament.
Connect back to the piece with a slip stitch.
FINISHING
Weave the tail ends into like colors from the back using your crochet hook. Cut remaining tail close to the piece. Voila!

Option
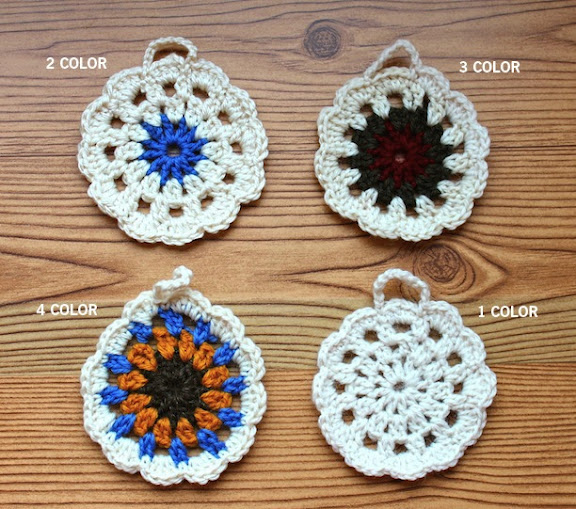
You can choose to change colors for each round, or make a series with only a few color switches. The pattern also looks great with a single color, too!
*A note about the project
This is an intermediate level crochet project, so the directions below do not include our basic tutorial. But for all you beginning crocheters, Assemble will be launching our Crocheted Granny Square Kit THIS FRIDAY, which includes full directions, diagrams and all materials. These ornaments are a modified version of our granny square pattern!

Materials
1. 3.5 mm crochet hook
2. Baby or sport weight yarn in several colors
+ Scissors

ROUND ONE
Start with a loose slip knot.
Chain 5.
Connect last chain to slip stitch to create a circle.
Chain 4.
Double Crochet through the center of the circle, then Chain 1.
Repeat DC, CH1 for a total of 12 spokes through the center of the circle.
Complete round by connecting yarn to the first spoke, in the third chain up, with a slip stitch.
ROUND TWO
In the chain space between the first two round one spokes, add a new color with a slip stitch. Chain 3 (counts as a DC) and then Double Crochet. Chain 1.
In the next space between spokes, DC twice then Chain 1.
Repeat DC2, then CH1 between all 12 spokes of round one.
Complete round by connecting yarn to the first spoke, in the third chain up, with a slip stitch. Cut yarn, leaving a 3" tail and tighten.

ROUND THREE
In the chain space between DCs of round two, add a new color with a slip stitch. Chain 3 (counts as a DC) then Double Crochet. Chain 2.
In the next space between sets of DCs, DC2 then CH2.
Repeat DC2, then CH2 between all 12 sets of round two.
Complete round by connecting yarn to the first spoke, in the third chain up, with a slip stitch. Cut yarn, leaving a 3" tail and tighten.
ROUND FOUR - Scallop
In the double chain space between sets of DCs of round three, add a new color with a slip stitch. Chain 3 (counts as a DC) then DC3 in the same space for a total of 4 double crochets.
Single crochet in the middle of the next set of DCs.
DC4 in the next double chain space.
SC inbetween the next set of DCs from round three.
Repeat until scallop is complete, and connect where you began. Cut yarn, leaving a 3" tail and tighten.
ADD CHAIN LOOP
Chain 8 to 12 chains out from the perimeter of the ornament.
Connect back to the piece with a slip stitch.
FINISHING
Weave the tail ends into like colors from the back using your crochet hook. Cut remaining tail close to the piece. Voila!

Option
You can choose to change colors for each round, or make a series with only a few color switches. The pattern also looks great with a single color, too!
Monday, November 26, 2012
Crafty Projects: Sweet, Polymer Clay Ornaments

I'm a sucker for quirky ornaments on a tree, especially neon! I have a pre-lit, artificial, white tree, (due to the fact that I have a vacuum for a chihuahua and she would eat the fallen needles) which really showcases snazzy ornaments. So, I really had fun making these for friends, family--and a few for Assemble! Plus, they're super easy to make:

What you'll need:
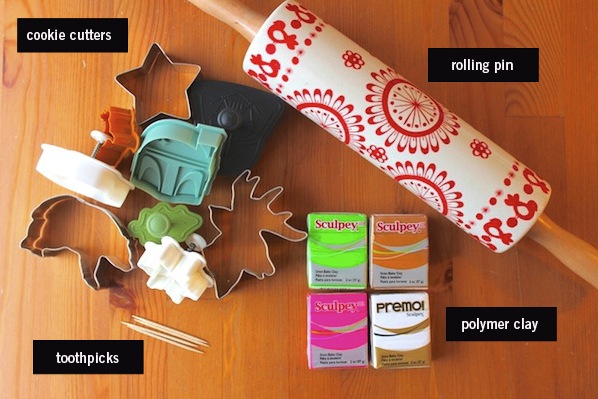
• Cookie cutters. My favorites are the crust punch-out cutters from Williams-Sonoma because they also make an impression on top of the clay (or dough, if you're using them for baking). I used a few of their seasonal ones, some Star Wars favorites and some good ole' woodland cookie cutters.
• A rolling pin. I've found that ceramic ones work best with this project, because the wood tends to soak up oils from the clay and stain.
• Polymer baking clay. I used Sculpey, but you can also use Fimo or any other type you find at a craft shop.
• Toothpicks.
Not pictured, but still needed:
• Parchment paper
• Cookie sheet
• An oven
• Double-sided tape
• Twine or string to hang on the tree!

Unroll a piece of parchment paper as wide as your table and place double-sided tape under it, to keep it as stationary as possible. Tape doesn't hold parchment paper well, but this will help when rolling. Use a different sheet for each color. Roll the clay until it is roughly 1/8 of an inch. Try not to fold the clay over too much, as it will create air bubbles.

When the clay is completely flat and even, cut out your ornamanents gently! Then using your toothpick, poke a hole big enough to get your twine or string through. Make sure to make the hole in a place where the weight of the ornament will distribute evenly, and hence, hang straight.

Place them on a non-stick cookie sheet (use another sheet of parchment if you would like), and bake them according to the clay's instructions. I baked mine at 275ºF for about 20 minutes.


Subscribe to:
Posts (Atom)


