Have you written your holiday thank you notes yet? I have to admit that I haven't. I'm usually one of those people that does it so quickly that I may as well write it in front of the giver, but this holiday season was a busy one with packing up the space, etc.
Now that I have a bit of time, I thought it would be fun to make my own! If you lke rubber stamps, but haven't embossed, let me tell you: you're going to love it! Embossing (in stamp & ink terms) is the process of melting tiny granules of plastic over your image to create a shiny, raised impression. Heat embossing also sets the image, so there is no possibility of smudging. Here is a super simple tutorial:

You will need:
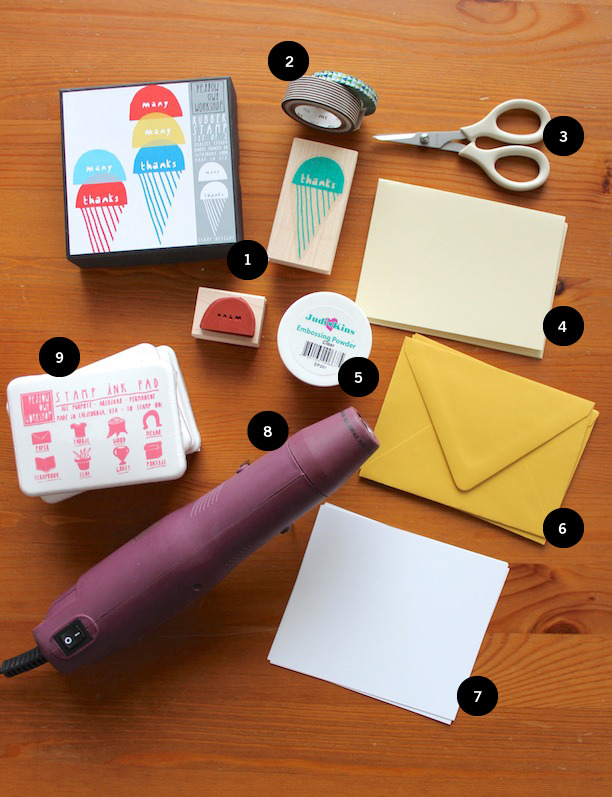
1. Some stamps! I this Yellow Owl Workshop Many Thanks Stamp Set. Love their sets! Plus the packaging is so cute.
2. Washi tape: To close up the envelope or decorate your card if you wish.
3. Scissors
4. Notecards: I used 4bar sized folded notecards in cream.
5. Clear Embossing powder: you can get this at most craft stores in a variety of colors (even sparkly).
6. Envelopes: I used 4bar Aflap envelopes in curry from Paper-Source.
7. Some scratch paper.
8. An embossing gun. These are relatively inexpensive and you can find them at craft stores.
9. Ink pads of your choice. I used Yellow Owl colors and a few Colorbox pigments.
Time to get started! Ink your stamp by pressing it into the ink pad gently until saturated. Stamp it a few times on the scratch paper. Stamps work best when they have been used for a while, so make sure that the impression looks perfect to you.

Continue using your other stamps and colors! Make sure to clean your stamps thoroughly before pressing them into a different colored ink pad. I use windex and paper-towels, but baby wipes work very well too. Never wash stamps in water, as you may loosen the glue beneath the rubber. If you are using acrylic stamps, make sure to buy the correct cleaner to keep your stamps clean and new.


While the ink is still wet, pour embossing powder all over the impression. Pour the excess back into the container of powder. It's very important that you do this while the ink is wet, or it won't stick to the image. You can wait all day to actually heat it, but make sure the powder is on it when it's wet.


Heat the powder with the embossing gun (staying about 6 inches away) until you can visibly see the powder melting, and becoming glossy. You will be done when there is a glossy, soft sheen on the image. Don't touch it until it's dry! If you don't have an embossing gun, I have heard of people holding paper over a stove burner to melt the powder but DO THIS AT YOUR OWN RISK. Eek! Also, a hair dryer sounds like a good idea but it's not: it just blow the powder off of your image.

Now write your letter! Handwritten or (in my case) typewriter-typed notes are sweet and genuine. Make sure to mention the specific gift you received, a little description of it or what you are planning to do with it, a personal sentence or two, and you're done!

For a sweet touch, close the envelope with a piece of washi tape and pop in the mail. We receive mail so infrequently that even just a little note is sure to make someone's day.

If you'd like some more stamping fun, check out this great video tutorial by our Favorite Friend, Kathryn Murray, on stamping and cleaning stamps, plus the difference between acrylic and rubber:
Rubber Stamps: Acrylic vs. Wood from Kathryn Murray Calligraphy on Vimeo.


